One of the major questions that business owners have today is: How to add my business to Google? Answering the question directly, to add your business to Google, create or claim a free Business Profile at business.google.com/add. Once you visit the webpage, you will need to enter your business name, category, location and related fields as they appear on the screen. However, at times, creating a Google Business Profile can demand professional assistance. To create an accurate business profile, consulting with the best digital marketing agency can help you choose the most appropriate business category and fill out associated details.
In this guide, we’ll go through the 7-step process for how to add your business to Google. We’ll also explore which business setup you should use, what to do if your business is already listed on Google, mistakes to avoid and many more things. So keep reading!
Step-by-Step: How to Add Your Business to Google
Adding your business to Google begins with checking for an existing listing or creating a new entry. Before you turn on your PC and visit the setup page, confirm that you have the essential details mentioned in the checklist below:
- A Google Account that the business owns
- The business name exactly as it appears in the real world, including on signage
- A primary category that accurately describes what the business is
- Your physical address or the areas you serve
- A phone number controlled by the business
- Your business website, if you have one
- Regular opening hours
- A few genuine photos of the business
For better understanding, the following 7 steps are given with screenshots of the setup page.
Step 1: Sign In With the Google Account That Will Own the Profile
Turn on your PC, open your preferred web browser and sign in to the Google Account that will be associated with the business. Why on a PC? Because most of them have a wide screen and allow you to easily read and fill out all related fields.
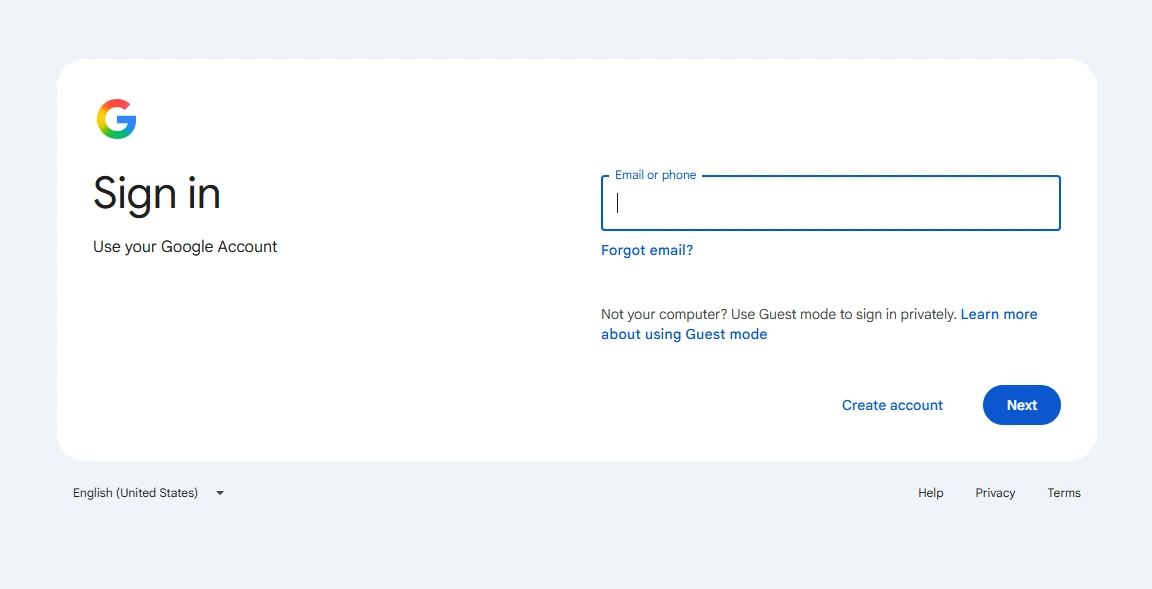
As you can see in the screenshot, first you need to enter the email or registered phone number for the Google Account the business owns. Do not use any employees’ or other parties’ Google Account to create the business profile. Once you click Next after entering the necessary details, you’ll have to enter the password and verify through 2-factor authentication (if applicable) to log in.
Step 2: Check Whether Google Already Lists Your Business
To check whether your business is already listed with Google, visit Google Maps, Google Search or Google Business Profile. Type your business name and location in the search bar of each tool and press ‘Enter’. If your company appears, you can claim the business on Google instead of creating a second profile.
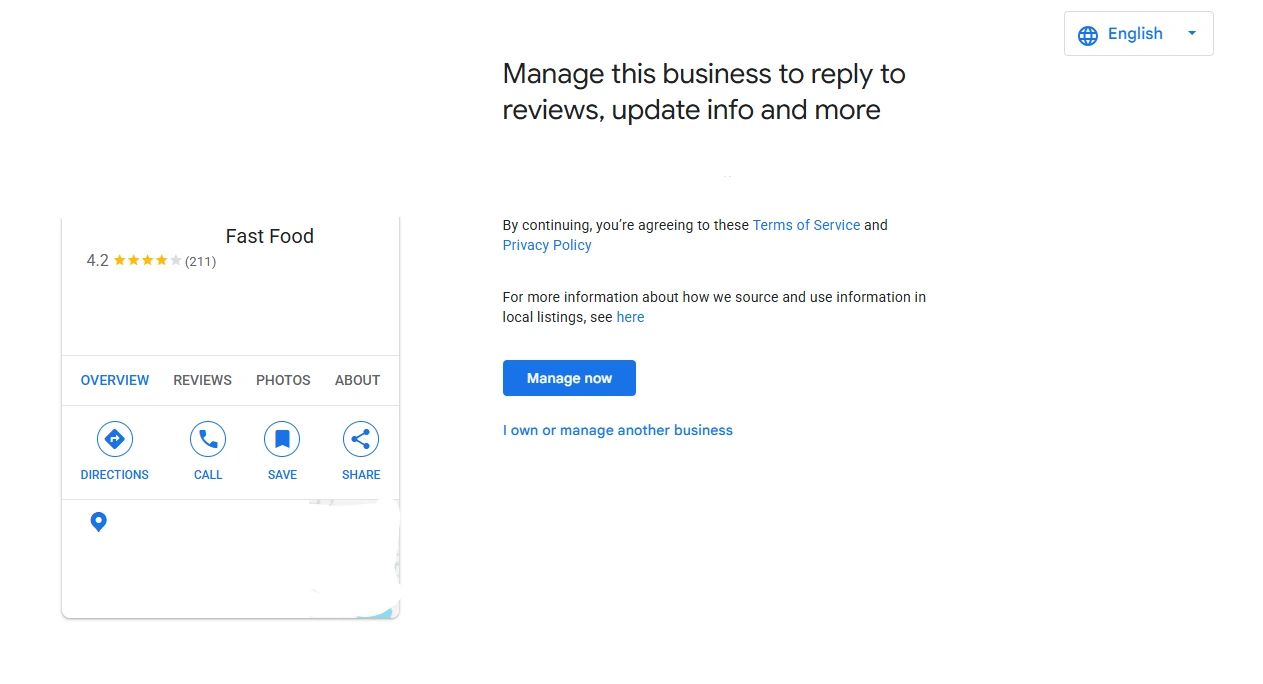
Here is a partial screenshot of a fast food restaurant taken from Google Business Profile. Some details are removed, considering the privacy of the restaurant owner. The business is already managed by someone and shows a button for “Manage Now”. Sometimes the button may also show “Request Access”. In either case, you need to click on the corresponding button to get back the Google listing of your business.
Once you click on the Manage Now/Request Access button, Google may ask you to enter your access levels, your relationship with the business, your contact name and your phone number. The exact required details depend on the on-screen instructions. Next, click on the checkbox for further updates and terms and conditions. This situation may become tricky. If your business name is already listed on Google, seeking assistance from a reputed digital marketing agency can help you regain online control of your business.
Step 3: Enter Your Business Name and Primary Category
If your business name is not listed on Google, you’ll be able to create a new business profile. To begin the setup, visit business.google.com/add, enter your business name and choose your business type, such as online retail, local store or service business.
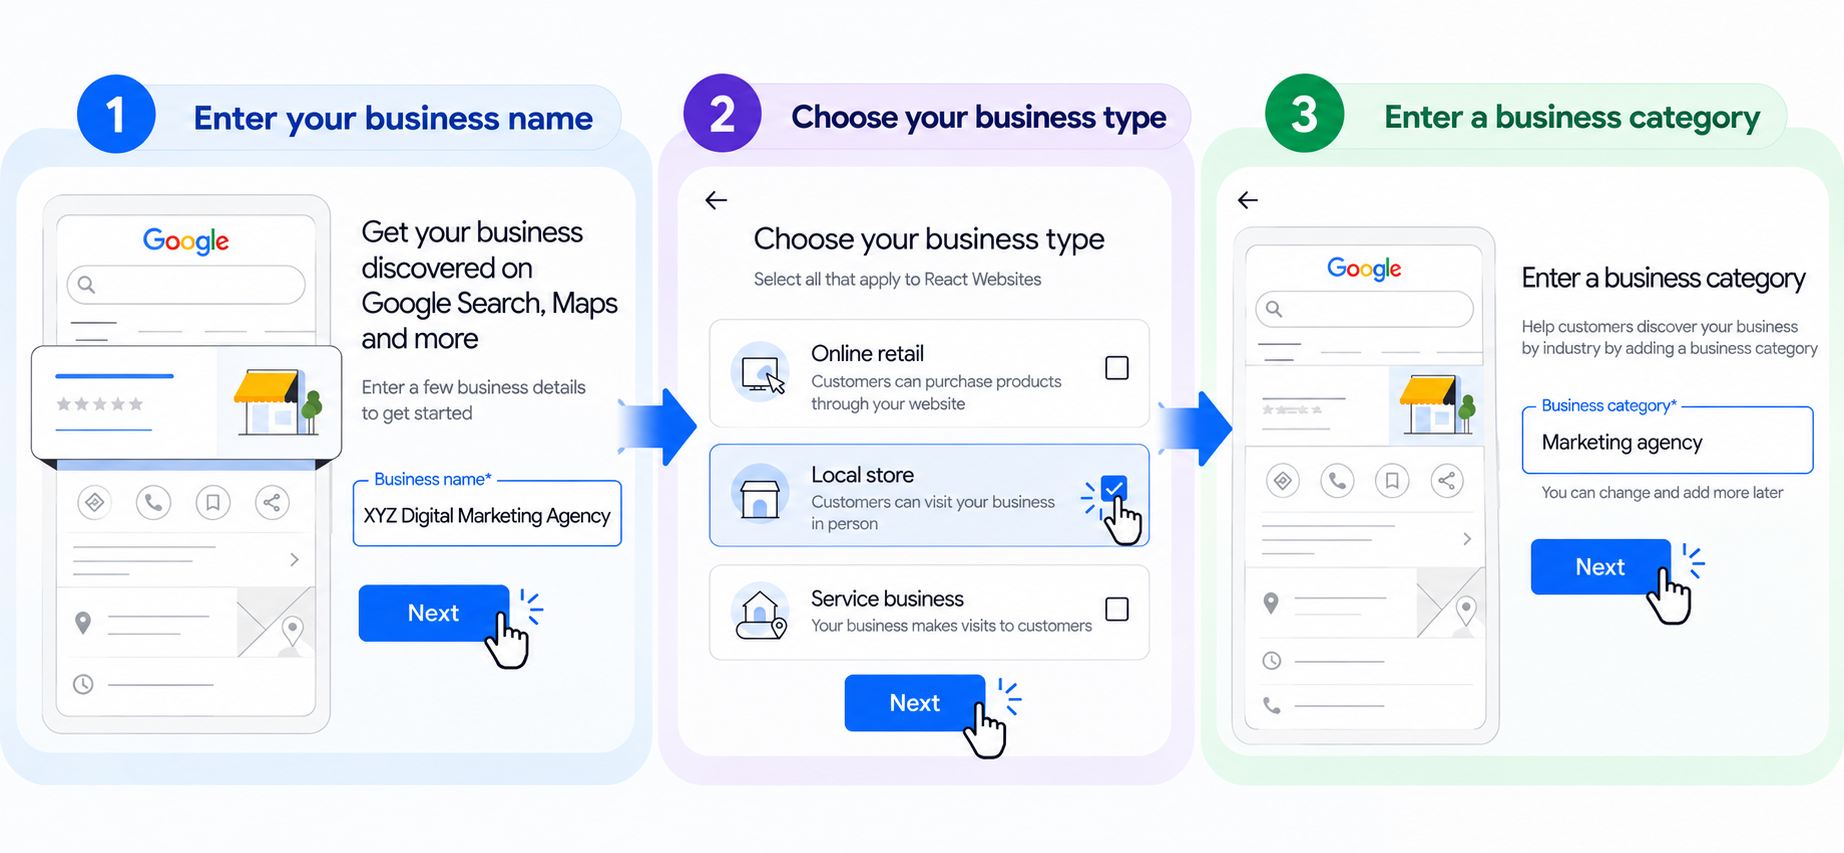
While filling out these sections, it may look similar to the above images. After choosing the business type, click on “Next”. On the following page, you need to choose a business category, such as a fast food restaurant or a cafe and click “Next”.
A quick tip: If you choose online retail, you may need to enter the website of your business as well before entering the business category.
Step 4: Add Your Address or Service Area
After confirming your business category, the following page may appear for entering your business address. Google uses exact address entries to determine customer distance during proximity-based search queries. While entering your business address, you may need to fill out the boxes for Country/Region, Street address, City, Pincode and State.
Here is a quick visual look at the fields that need to be filled out for entering your business address:
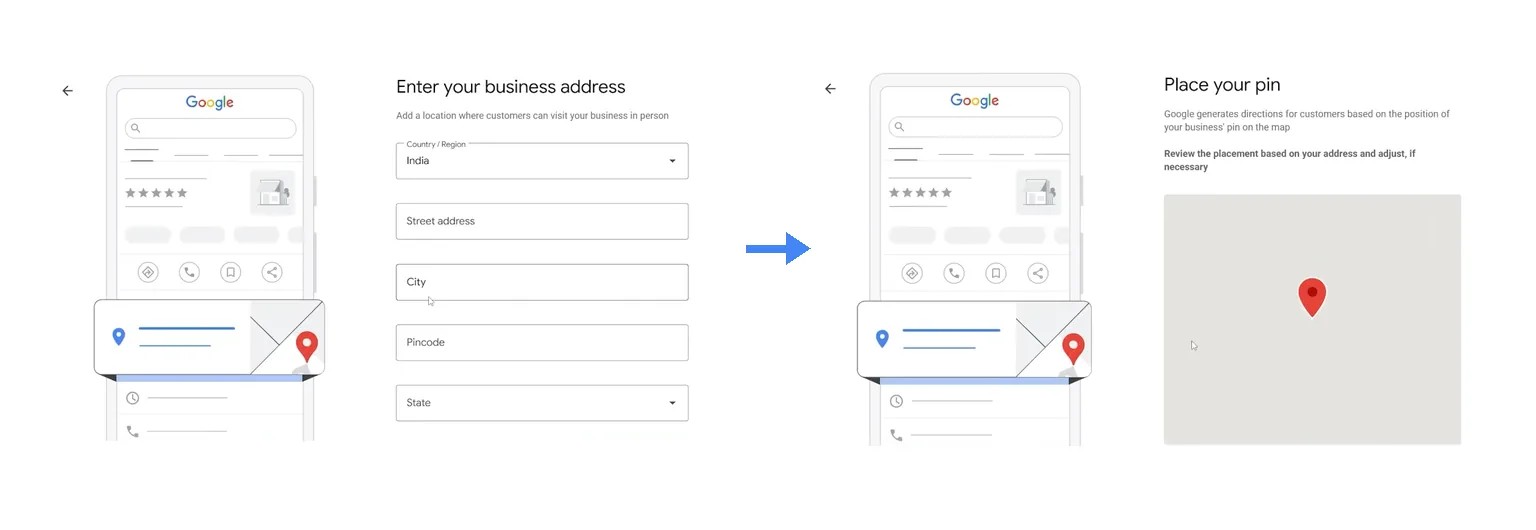
Note: The exact fields may change as per the updates from Google.
After entering address details, you have to pin the exact location where your business is located and click on the “Confirm” button. This step allows you to add your business to Google Maps so customers can easily find your physical storefront.
Step 5: Add Your Phone Number and Website
The next screen after entering the address asks for your phone number and website (if applicable) as contact details for customers. The addition of website URLs that embed LocalBusiness structured data ensures Google validates contact information quickly. You may skip this step if not required.
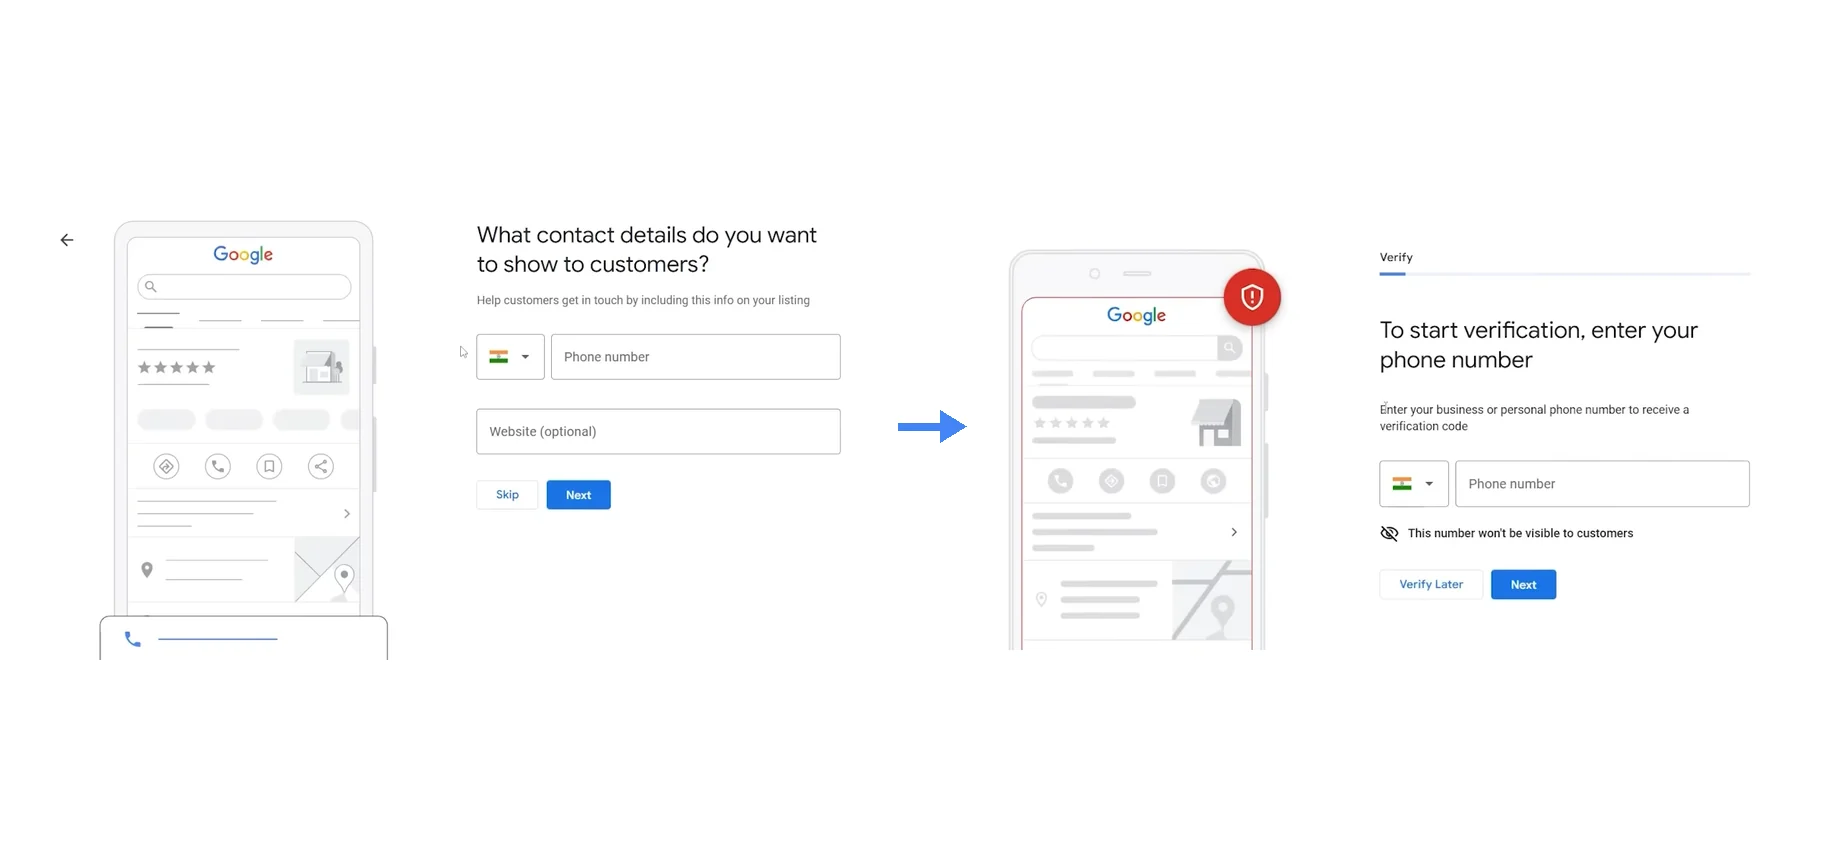
But on the next page, Google ask for a phone number to start verification, and this step is mandatory. Here is how it looks in practice:
Step 6: Verify Your Business
To verify your business, you may need to enter a code sent to your email address, mobile number or complete video verification. Here’s what it typically looks like while you verify your business:
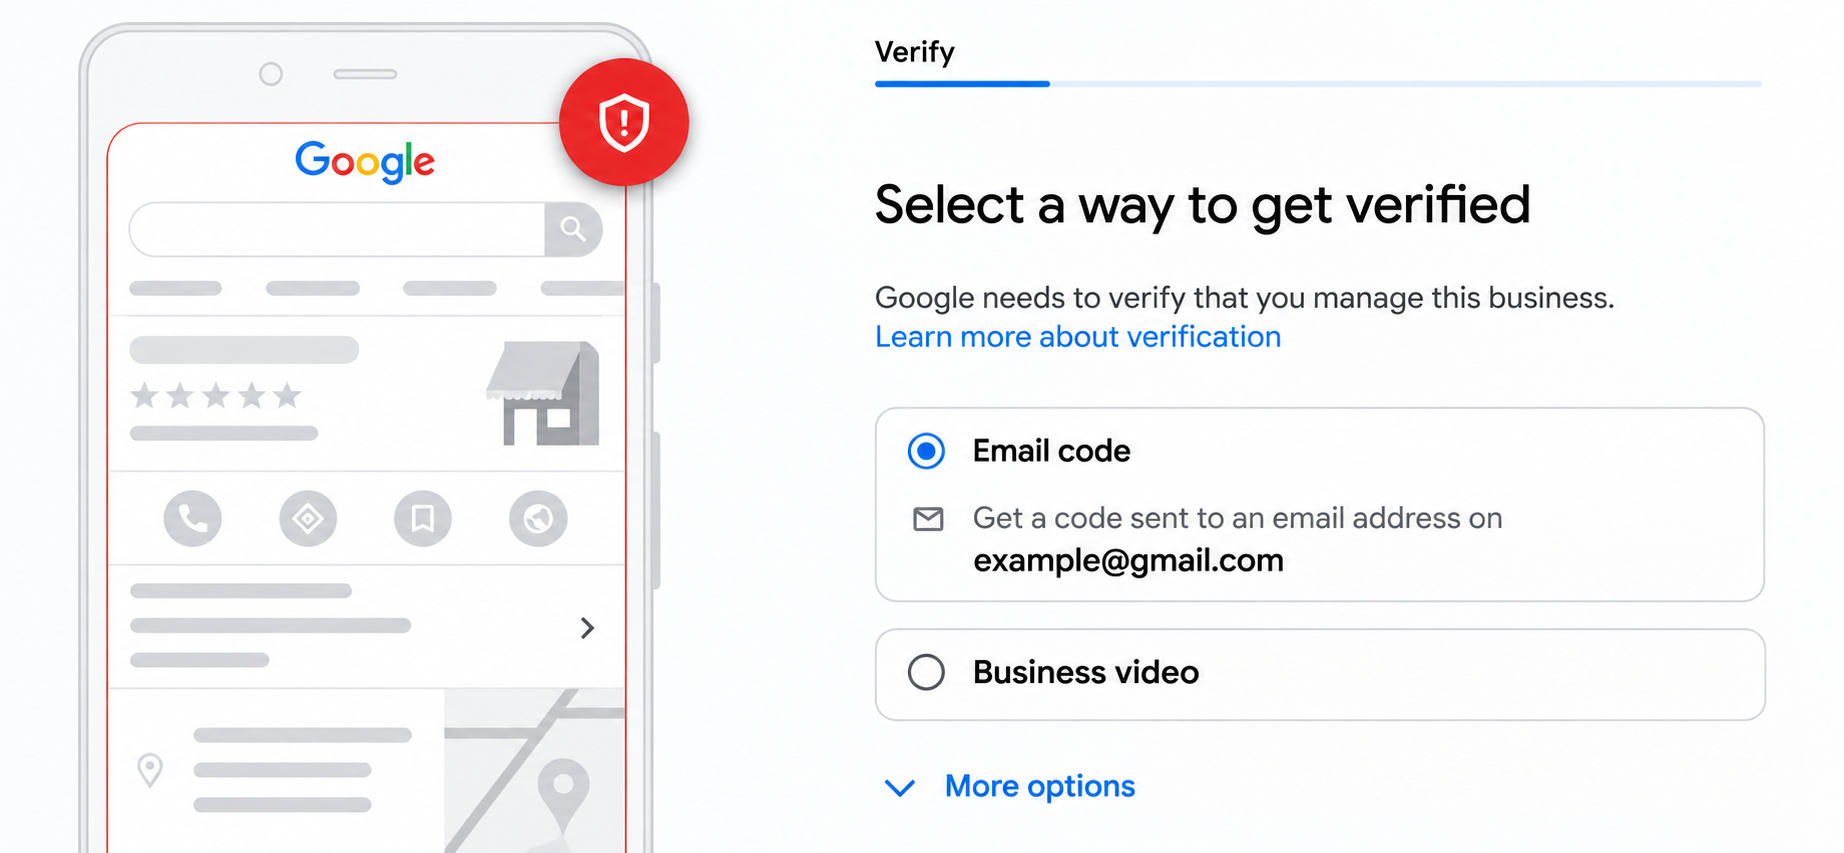
If you experience any issues verifying your business, consulting a specialist ranked as the best SEO company ensures swift, compliant resolution.
Step 7: Add Hours, Photos and a Description
After verification, you have to add the business’s operating hours, a short description and photos. These details help to connect with customers in a better way and boost search relevance.
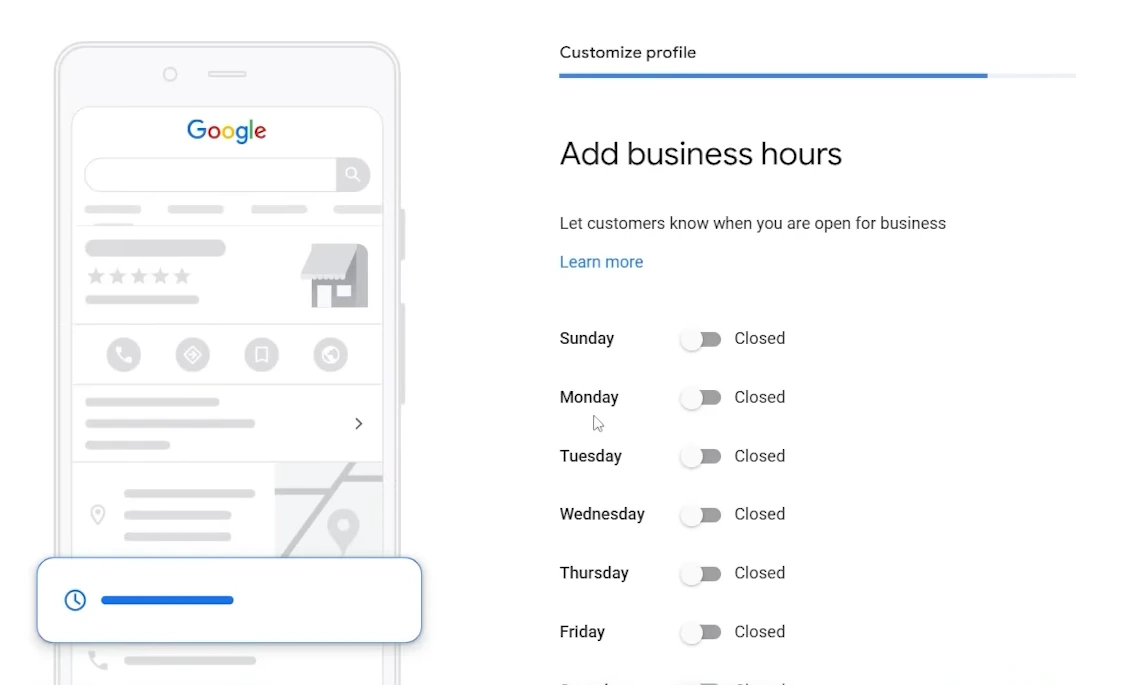
As shown in the image above, you can choose which day your business remains open or closed by tapping on the toggle switch. When you tap on the toggle switch, you can also choose the opening and closing time of your store or office. After setting the day and time of operational hours, click on “Next”.
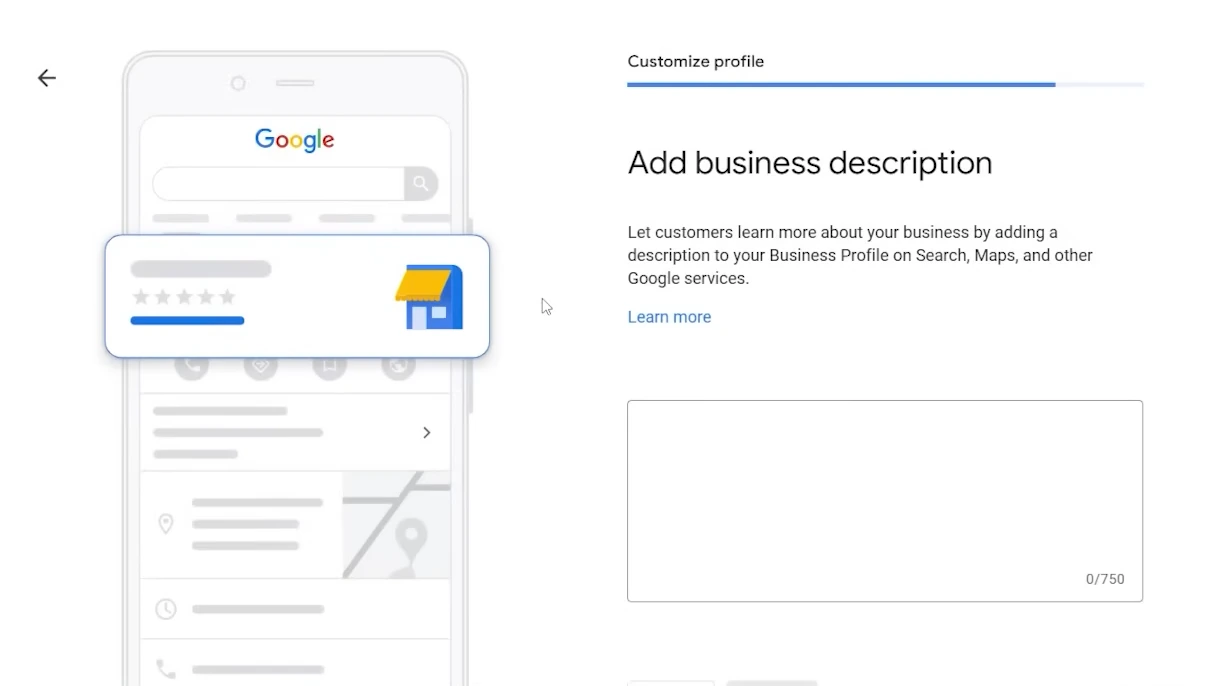
Step 8: Add Your Business Description
In the next window, you need to enter under 750 characters description of your business in a box just like the one presented in the above image. The requirement for description length may change as per Google’s updates, so confirm that while entering such details. Click on “Next” once the description is filled out.
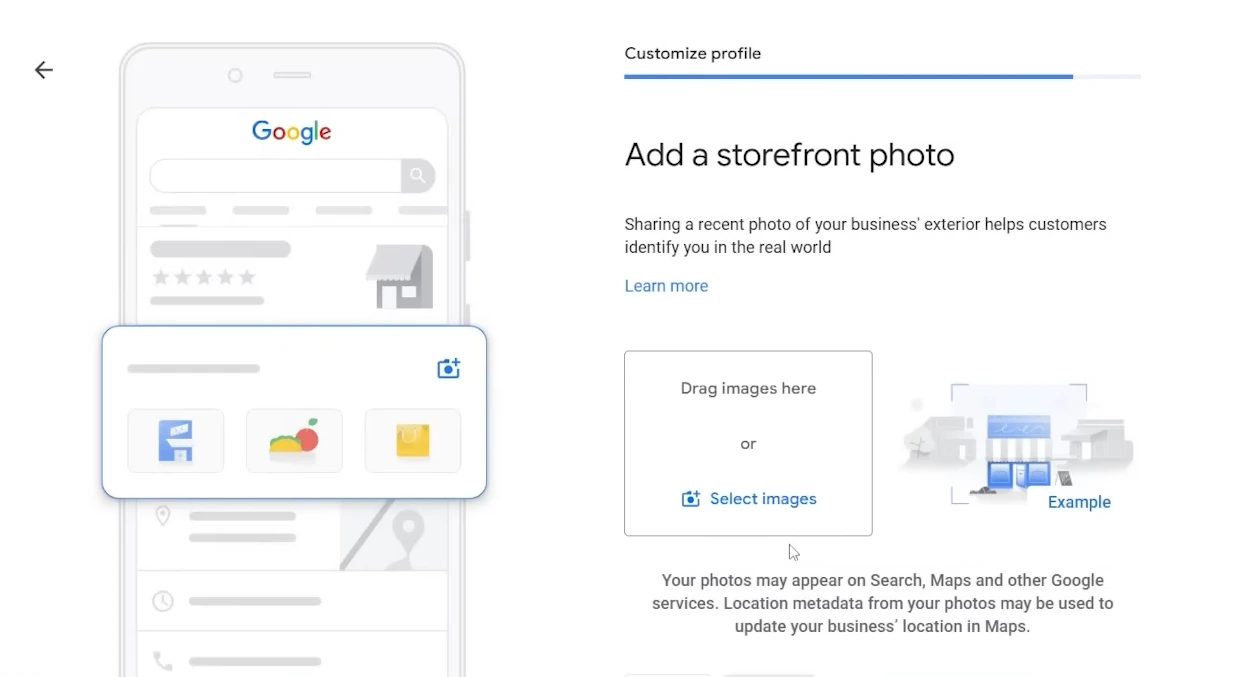
Step 9: Add Your Front Image of Location
In the next step, you will need to enter your business premises’ front image. Make sure that the image remains clear and properly shows your business name or any other highlighting feature. Once the images are uploaded, click on “Next”.
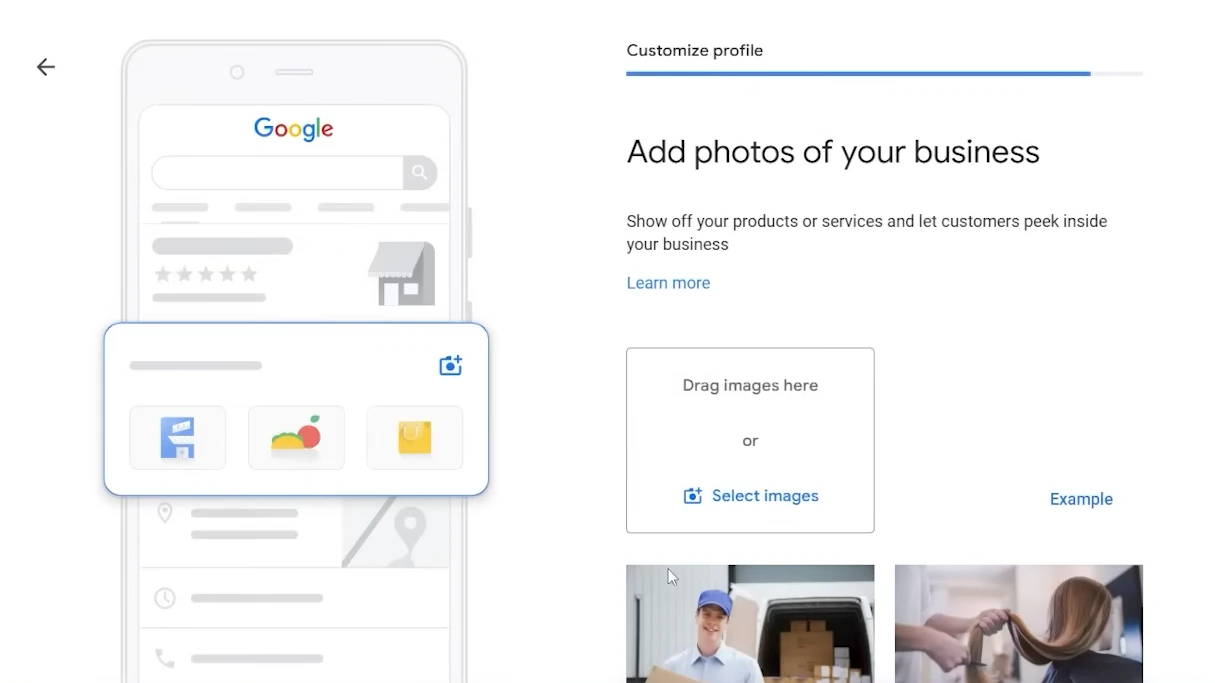
Step 10: Add Your Business Related Images
Now, enter some more images of your business. They can be interior or exterior images of your business and other images, depending on your business. After submitting photos, click on “Next”.
Now you may get a pop-up for additional services from Google, which you can skip. After taking or skipping additional services, a message will appear on the screen stating that “your edits will be visible once you are verified”. Next, click the “Continue” button.
Congratulations! Your new Google Business Profile is ready to use. Now give updates, respond to customer reviews, upload more photos, add a menu, run Google Ads and much more with it.
Note:The above steps to create a Google Business Profile are updated as of September 2026. The actual steps may change depending on the updates from Google. For the most feasible outcome, follow all on-screen instructions.
Storefront or Service-Area Business: Which Setup Should You Choose?
Both businesses serve different purposes, so there is no one size fit for all. The table below highlights some more differences between a storefront and a service-area business:
| Business type | Who it suits | What to enter | Is the address public? | Example |
| Storefront business | Businesses where customers visit the location | Physical business address | Yes | Restaurant with a customer-facing location |
| Service-area business | Businesses that travel to customers | Service areas | No | Plumber serving several cities |
| Hybrid business | Businesses that serve customers at their location and travel to them | Physical address and service areas | Yes | Diagnostic centres that provide home sample collection |
How Google Business Profile Verification Works
Google Business Profile verification works through a series of steps and it may not be the same for everyone. Some owners verify via text, whereas others complete postcard verification or record a video showing the business front space and interiors.
Here are some commonly available Google Business Profile verification methods, along with what you need to do and what you should have:
| Verification method | What to do | Have ready |
| Phone or text | Enter the code received | Business phone |
| Follow the email instructions | Business email | |
| Video recording | Upload a verification video of a minimum of 30 seconds duration | Mobile device, location access, signage, equipment, products, tools, or management evidence |
| Live video call | Show your business during a call | Mobile device and business proof |
| Postcard | Enter the mailed code | Correct mailing address |
| Instant verification | Complete Google’s available instant check | Eligible Google signals |
| Bulk | Apply for bulk verification. | Multiple eligible locations |
What to Do If Verification Fails or Gets Stuck?
If your Google Business Profile verification is stuck because the verification code does not appear in your email, check all mail and the spam folder as well. Sometimes emails get categorised in different sections. In case the mobile sms code is not received, try enabling aeroplane mode and then turning it off after 30 seconds. It refreshes your mobile signals and the code may appear in your messages app.
For video verification concerns, select Review issues and follow Google’s instructions to correctly capture the footage. If issues persist, consult an online reputation management company to protect customer perception.
What to Do If Your Business Is Already on Google
If your business is already listed on Google, it will appear on Google Search, Google Maps and Google Business Profile. You can make edits related to your description, address, phone number, services and other services upon meeting the verification criteria for each change.
Encountering an unverified profile or another account’s ownership complicates managing your business listing on Google. The sections below explain how you can recover your account if you encounter such issues:
How to Claim an Unverified Profile?
Open Google Maps or Google Business Profile on your PC or mobile with the same Google account in which you wish to recover your unverified business profile. Tap on the search bar or icon and type the name and location of your business, then click on your business name as it appears.
Scroll down, and you may get an option like “Claim this business” or “Manage Now”. Tap on the available button, follow all on-screen instructions, fill out the necessary fields and upload the required documents. Once you submit all details, Google may resolve the issue within a few days if all details are submitted accurately.
How to Request Ownership From the Current Owner?
You can request ownership of a business profile through Google Business Profile. The following are simple steps to get ownership:
- Visit business.google.com/add.
- Enter the name and address of your business.
- While entering the name and location, you’ll be able to choose your business from the list.
- Tap on the business, and you will get a message like “Someone else may manage this Business Profile”.
- In the same window, a button will appear as “Request Access”.
- Tap on that button and fill out all necessary fields.
- Click on “Submit”.
Once you have submitted the request to verify your Google Business Profile, you’ll get an email confirmation and an on-screen message like “If the business has not responded by a specific date, you may be able to gain access”.
At the same time, Google notifies the current profile owner via email, and they have to respond within 3 days. After the current owner’s response and review of all proof, Google approves or denies your review request. You will also get an email regarding this update.
Mistakes That Can Get a New Business Profile Suspended
Google may suspend accounts that misrepresent real-world operations or violate established Business Profile guidelines. The table below presents some common setup mistakes that you should avoid while creating a business profile on Google:
| Common setup mistake | Why Google may flag it | What to do instead |
| Keywords in the business name | Name does not match the real business | Use the name shown on your signage and business materials |
| Virtual office or P.O. box | These do not represent an eligible business location | Use your actual eligible location |
| Visible home address for a service-area business | The address is not a customer-facing location | Remove the public address and specify your service area |
| Duplicate profiles | Google allows one profile per business location | Claim or manage the existing profile |
| Phone number or URL redirects elsewhere | Contact details do not match | Use the business’s direct phone number and website |
| Broad or excessive categories | Categories are not focused | Choose the fewest specific, relevant categories |
How to Add Your Business Website to Google Search?
You can add your business website to Google Search by following the five steps below:
- Visit Google Search Console and sign in with your Google account.
- Click on Add property, select a property type between Domain (for all URLs) and URL prefix (For a single URL).
- Paste your website link into whichever is suitable as per your requirements.
- Verify ownership by HTML tag, Google Analytics, Domain name provider and Google Tag Manager by following the on-screen instructions.
Once the property is verified, you will be able to view the website-related metrics on the Overview tab of Google Search Console. These steps can be quite technical. If you experience any issues, you can seek assistance from digital marketing experts.
What to Do After Your Business Profile Goes Live?
Once your Google Business Profile goes live, focus on building your brand presence with accurate and updated information. This step highlights the importance of local SEO in keeping customers engaged. Here are some ways to build a strong brand presence:
- Respond to customer reviews promptly.
- Update the operational hours periodically and during holidays.
- Upload new, updated photos of the business when launching new services or products.
- Share timely updates on offers and announcements.
- Timely review your profile’s performance insights to understand how customers interact with it.
Why Choose The Cogent for Local SEO?
The Cogent helps businesses to build a stronger market presence across the local market, like Jaipur, along with optimising Google Business Profile. Here are some highlights of our services as the top website development company:
- Built trusted local search visibility for a multispeciality hospital.
- Provided longer search visibility for premium jewellery brands and event planning brands.
- Offers web design & development services along with SEO for complete digital marketing solutions.
- Social media marketing to increase brand reach.
- Has more than 100 people on the team to serve brands.
- Operates in more than 45 different sectors.
Reach out today to increase local prominence and the visibility of your brand.
Conclusion
You can add your business to Google through the Google Business Profile. This tool allows you to create new listings, review unverified ones and helps you get back your business listing if it is claimed by someone else. To get this facility, visit the Google Business Profile Page, follow all given steps, submit accurate details and documents and respond in a timely manner. By following all steps promptly, you will be able to manage your business profile listing on Google in a feasible manner.
Frequently Asked Questions
Yes, you can list your business on Google for free through the standard merchant registration process.
To create a business listing on Google, you’ll need to create or claim an eligible business profile with accurate information and complete all verification steps.
Google’s 20% rule simply refers to its employee practice of allowing some time for other projects that they believe will most benefit the company.
Eligible people are business owners who make in-person contact with customers during the stated hours.
Yes, you can have two business profiles for eligible locations. But you should not have duplicate profiles for the same business and same location.
As per Google, the verification review may take up to 5 business days.
Google Business Profile is the new name for Google My Business. This change has been made to simplify management and seamless integration of the platform into Google Search and Google Maps.